US
USFollow the White Blazes: How to Hike the Long Trail of Vermont

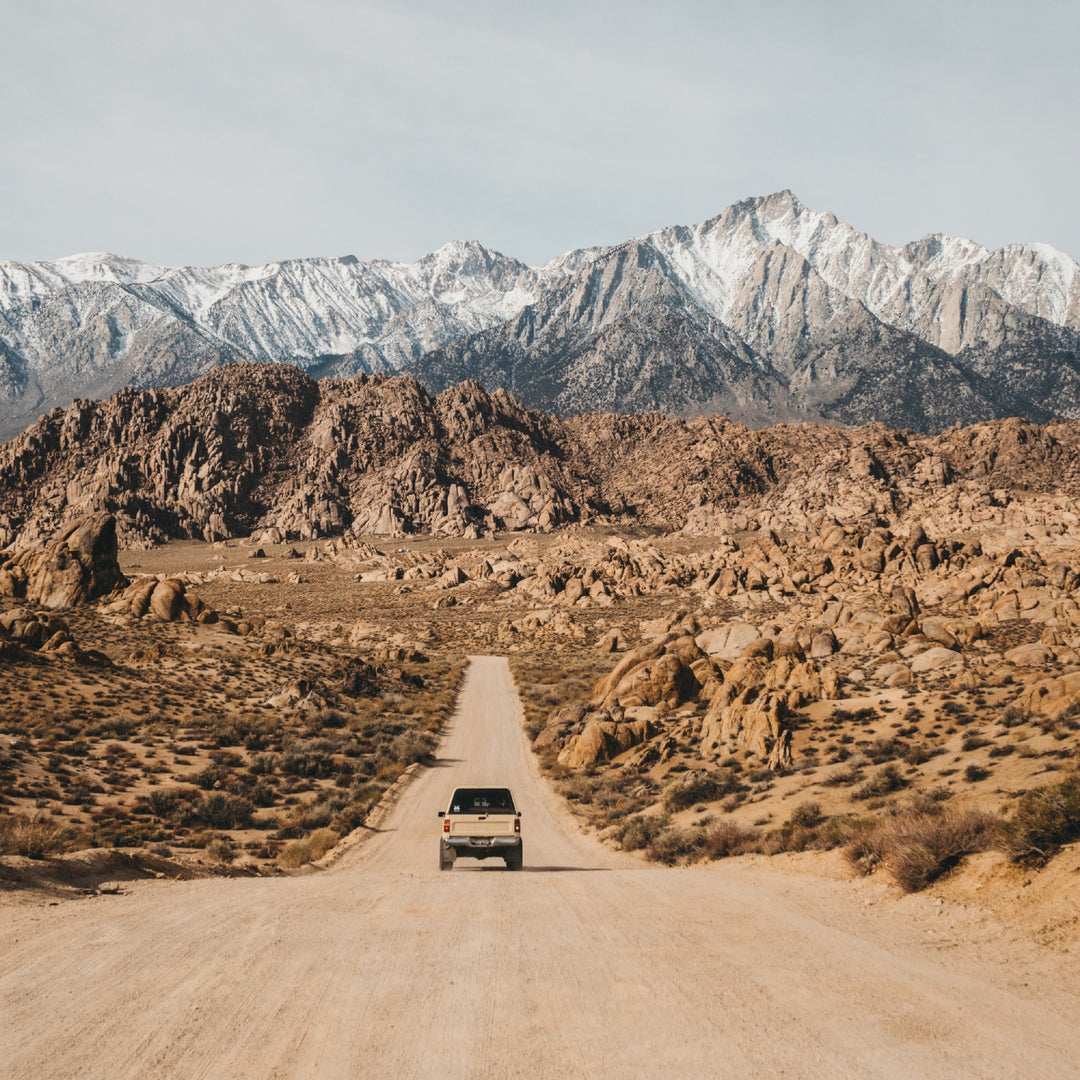
The Long Trail (LT) of Vermont is a 272-mile hiking route that follows the main ridge of the Green Mountains from the Vermont-Massachusetts border all the way to Canada. Steeped in rich history, the Long Trail is America’s oldest long-distance hiking trail, conceived in 1910 by the Green Mountain Club. The Long Trail inspired the Appalachian Trail, and today the two trails overlap for about 100 miles in southern VT.
Planning a thru hike? Download our printer-friendly thru hiking checklist
My Favorite Place on Earth
It is literally my pleasure to encourage you to take on this challenge. I first hiked the Long Trail in 2010 with my best friend Ben. I’ve walked it twice more since then, and I plan to hike it several more times. It is not an overstatement to say that it is my favorite place in the world and where I feel the most like myself. The LT is not an easy undertaking. However, I promise it is enjoyable, and you will learn much about yourself along the way.
Whether you’re trying to set the next Fastest Known Time, taking a leisurely walk through nature, or headed out for a few days to give backpacking in VT a try, there is a LOT to consider for your journey to be comfortable, fun, and safe. In this post, I hope to break it all down into accessible, GORP-sized chunks.

Muddy, Rocky, Rooty... and Straight Up Hill
Those new to hiking in VT might be surprised by the diversely rugged terrain that makes up the Long Trail. The Long Trail is (proudly) not easy.
Switchbacks? What are those? The Long Trail goes straight uphill. The peaks may be small by some standards, but they are challenging, with many ups and downs.
And did I mention mud, rocks, and roots? The Long Trail has notoriously difficult footing, making miles feel longer. This makes it even more rewarding as it’s a more significant challenge to overcome. Consider all of this in your planning.
End-to-End Duration: How Long Does It Take?
The Green Mountain Club reports that the average Long Trail thru hike takes between 20 and 30 days. This range depends on personal ability, itinerary, and style; are you trying to hike big miles and push yourself, or take it easy?
My first time hiking the trail was just over 20 days. My second and third times were faster. Next time I do it, I want to take my time, relax, and check out some side trails.
Northbound or Southbound: Which Direction Should I Hike?
Having thru-hiked both ways, I will firmly say there is no wrong direction to hike. Both are beautiful and offer a different experience.
The northern section of the trail is objectively more technical and wild and therefore “harder.” Most of the dramatic elevation changes occur north of Lincoln Gap, many of which are unexpected given they are not common landmark peaks or sections. Mix this with rocks, roots, ladders, and mud and you might be surprised at the technicality of the trail if you start at the US-Canada Border.
It is not uncommon for Southbounders to choose their direction so they are hiking the “harder” sections of trail first and then open up as the terrain gets more friendly in the bottom of the state. To be clear, none of the trail is “easy.” Therefore, the inverse might be appealing too; starting your Long Trail hike at the VT-Mass border might allow you to build your muscles and confidence for the more technical northern terrain ahead.
You will notice the Long Trail is quieter north of Maine Junction where the Appalachian Trail splits off from the Long Trail near the US Route 4 crossing in Killington/Mendon. You might consider this AT/LT traffic when choosing a direction if you’d prefer to see more people at the start or end of your journey.
One note: The US-Canada border is an epic finish given a border monument acts as a tangible ending to your journey, with a good view to boot. I know some hikers may choose Northbound based on this fact alone.
Weather, Mud, Snow, Rain, Leaves... When Is Best to Hike the Long Trail?
There are many points to consider when planning your Long Trail dates. You may want longer days, making late June-July a tempting timeframe. You may want to take in the famous Vermont autumn foliage. Or maybe you need to work around other commitments and have a stricter itinerary.
Every season has its unique challenges and advantages. And, given that the weather can change quickly in VT, you should always plan on a couple of chillier nights, even in the peak of summer.
Summer
June and July are good times to hike in Vermont; you will have plenty of water. Expect potentially busy trails and campsites, as well as black flies and mosquitos (see below about bugs). Late July and August are also great times. However, water can be more scarce depending on precipitation earlier in the summer. Nights will get chilly, especially at higher elevations, starting in August.
Fall

One of my favorite Long Trail hikes was at peak foliage in late September into October. Stunning. However, it was starting to get into the fall rainy season and was in the 40s most nights, even dipping into the low 30s with frost near the end. I also had to plan for shorter days, which made some higher-mileage days tricky.
Winter
Winter is an uncommon time to hike the Long Trail, but I know a few folks who have taken on that challenge and loved it. I won’t go into winter hiking here, but check out this blog about hiking in winter.
Mud Season
It is essential to mention that the Long Trail is closed at higher elevations (2500+ feet) during “Mud Season,” the notorious fifth season in Vermont between April and May. While the Long Trail has mud in all seasons, this mid-to-late spring period is incredibly delicate for the trail and its vegetation. I therefore highly encourage you not to plan a thru hike during this timeframe.
Memorial Day Weekend is typically when Vermont Trails will be dry enough to hike a more extended trip. Be advised, however, that snowpack can linger into early June on higher peaks. Check out the latest on hiking etiquette during Mud Season here on the Green Mountain Club’s website.
Navigation: Maps, Guides, and Other Resources

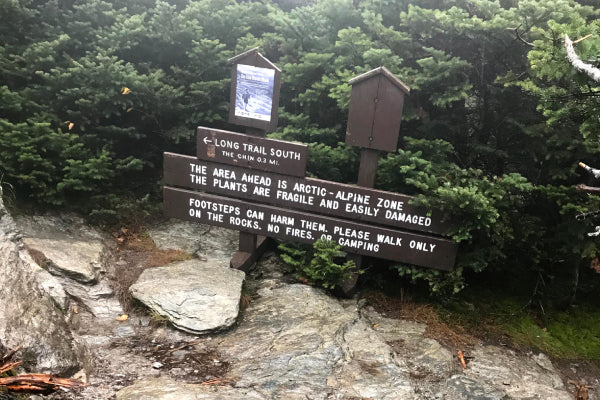
Follow the white blazes! The entire Long Trail route is marked by ~2x6-inch rectangle blazes painted on trees or rocks for hikers to follow. Trails are typically apparent, with the blazes acting primarily as confidence and clarification markers. Signs or other markers will adorn major trail intersections, landmarks, and shelter spurs, and other points of interest.
Blue blazes adorn side trails, including any side spur to a shelter. Since white blazes also mark the entire Appalachian Trail, pay attention at Maine Junction so you head the right way!
You can only count on white blazes and trail signs in the moment. You will also want other navigational assistance. As the caretakers of the Long Trail, the Green Mountain Club offers many helpful guidebooks, waterproof hiking maps, and online resources. There are also great smartphone maps by Avenza and FarOut that come highly recommended by friends.
I prefer the GMC’s waterproof topographical hiking map, which shows shelters, campsites, an elevation profile, accurate mileage, side trails, and more. The entire 272-mile route is on one document, and I don’t have to use my precious phone battery to know my location and what to expect over the next ridge.
The Long Trail Guidebook is an excellent resource for in-depth trail descriptions. It’s certainly not a requirement, but a nice to have. I use it for in-depth planning and leave it at home, carrying only the waterproof map. However, I know hikers who wouldn’t dare take on the trail without it in their packs. There is also an eBook option to help shed some weight.
The Long Trail End-to-Ender’s Guide is another fantastic resource (in addition to this blog!). I encourage you to check out those publications in your planning stages.
Where Can I Setup Camp?

As part of your planning, consider your approach to setting up camp. The Long Trail has rustic shelters roughly every 6 to 9 miles, with tenting options at most of those shelter sites. You might also be tempted to create your own site off trail. Let’s get into details so you are ready to get a good night’s sleep, while following proper Leave No Trace principles and fostering forest stewardship.
Shelters
Shelters are lovely spots to take a break during the day or to forego setting up your tent. To be clear, these are not outfitted cabins but simple shelters to protect from the elements. Some are fully enclosed lodges, and others are three-sided lean-tos. They are welcome to all hikers and kept clean by the honor system. You will need to pack in and pack out all the supplies to cook, sleep, and be comfortable.
Shelter sites are always close to a water source, and each has a privy outhouse, making them a great destination to camel-up and not have to squat in the bushes. Additionally, they consolidate camping into a shared location, which is more sustainable by Leave No Trace principles.
Perhaps most importantly, however, shelters create community by offering shared places to meet other hikers or leave advice, stories, and encouragement in the logbooks. Seriously, read and write in these logbooks, even if you aren’t staying long at a shelter! They offer updates on what’s coming up, where friends are, and endless entertainment.

Almost all shelters on the Long Trail have set areas to pitch tents if you’d prefer your own space or the shelter is full. A few shelter sites (the massive Taft Lodge on Mount Mansfield, for one) do not allow camping outside the shelter due to delicate terrain. Guidebooks and maps should help identify those.
Note that shelters, especially smaller ones, can fill up if it’s a rainy night or just by chance. I, therefore, recommend never counting on a spot inside a shelter. Be prepared to set up a tent or tarp.
Lastly, be considerate and pack out your trash and hang your food or use supplied bear boxes. This will keep rodents out of the shelters and everyone safe from larger critters—more on this below in Critter Considerations.

Additional Tip: The LT crosses several ski areas. Many summit warming huts are available for hikers to use (Stark’s Nest, Castlerock, Bromley, Madonna, and others). Open ski slopes make good low-impact tenting sites too. These huts are not official GMC sites, so will not be on the waterproof map. Guidebooks will mention them, as will other hikers and potentially some apps. Since they are ski-centric, don’t count on a water source at these warming huts.
"Stealth Camping"
Setting up your tent or hammock in a non-designated area is sometimes called “Stealth Camping.” This can be okay in some areas. It is strictly prohibited in others, like higher peaks, due to sensitive alpine vegetation. It is also important to know that the trail passes through several parcels of private land.
Considering the above, I encourage you to think twice before plopping a tent just anywhere. It is more sustainable to reuse older sites, hence why established campsites and shelter areas exist. If you do camp away from an established site, be considerate of the flora, and please don’t light fires.
Gear
Now that we’ve gotten some high-level planning pieces out of the way, let’s dig into some gear. Honestly, I could write a separate, extensive blog post on every bit of equipment listed below. On top of this, many of your choices will be down to personal preferences that could differ from mine. Therefore, I will keep this higher level and mostly about my personal preferences.
The Big Three: Pack, Tent, Sleeping System
The three biggest and heaviest items you’ll need to carry on the Long Trail are your pack, tent or shelter, and sleeping system (bag or quilt, and pad). Some folks might alter this slightly with a hammock setup or ultra-lightweight system.
Pack
In a world of the lightest outdoor gear ever, my weight philosophy for backpacking is that it is equally vital to acknowledge comfort and fit as it is to count ounces. For example, my current pack is a bit heavier than some ultralight packs, but its suspension fits me so well that it feels less heavy than many lighter packs I’ve tried. Your pack carries everything; it must be comfortable.
Sleep System
The same philosophy rings true for your sleep system. The miles you hike are only as good as your recovery. You need to get a good night’s sleep! Get the right sleeping bag and pad for you.
For temperature, I’d recommend getting at least a 35-degree bag, even in summer, as sleeping bag temperature ratings can be optimistic, and it can get cold in the woods at elevation. You may want something even warmer if you have a late-season hike planned.
I also bring a liner bag (silk or polyester), which can add warmth, be used alone on super warm and muggy nights, and keep the main bag clean. (Pro Tip: it is much easier to wash a liner bag than a full sleeping bag.) Gear shops will often have a place for you to roll out a pad and sleeping bag and try them out before buying.
I often stuff my puffy jacket or fleece into my sleeping bag sack for a pillow. There are some tremendous backpacking pillows out there too. If you sleep better, they might be worth the added weight.
Personal Shelter
As mentioned earlier, there are ample shelters along the Long Trail, and you’ll likely be okay to sleep in them many nights. But always air on the side of caution by bringing a tarp or tent in case a shelter is full.
Whatever tarp or tent you pick must be solid in the wind, rain, and potentially rocky/rooty surfaces. I recommend a “three-season” designation when looking at tents. I also endorse a ground cloth under your tent for waterproofness and long-term protection of your shelter floor. You can also roll out the ground cloth under your pad in a shelter if it happens to be older wood that could rip or pop your gear.
Clothing
I have two general clothing categories on the Long Trail – Hiking Clothes and Camp Clothes. I hike in the same clothing daily (except for socks, which I alternate). While this may sound gross, it likely won’t feel that way when you’re out there. The stink is inevitable. Embrace it.
A rule for all clothing on the trail: cotton kills. Use performance fibers like Merino Wool or performance synthetics designed to wick moisture, dry quickly, and thermoregulate. If you choose Merino Wool, you’ll have better like fighting the stink, too.
Hiking Clothes
Hiking clothes will get wet from sweat and/or rain. If they don’t dry overnight, I suck it up and put them on anyway, right before hiking. Within a quarter mile, they’ve warmed up. I think this is better than carrying several sets of hiking clothes, especially if one set is wet already.
Depending on the season, my typical hiking clothes include shorts with a liner (Patagonia Baggies are a personal favorite), a Merino fiber t-shirt, a breathable hat with a visor, Darn Tough hiking socks, and lightweight gaiters. We’ll discuss socks and shoes more in the next section.

I keep raingear right on top of my pack, ready to use as an extra layer or windbreaker over this system. If it’s colder weather, I may also bring hiking pants instead of shorts (with two sets of underwear to trade between), base layers to wear under my shorts and t-shirt, and an extra layer to hike in. These extra clothes were vital on rainy, cold days when I hiked the Long Trail into October.
For more details about hiking clothes, check out my coworker Alex’s post on What to Wear Hiking.
Camp Clothes
I keep lightweight leggings and a long sleeve shirt inside my pack as camp clothes to change into at the end of the day. No matter what, these always stay dry in case of an emergency. Long sleeves protect from bugs at camp. You may also be surprised how cold it can get at night, even in the heat of summer.
I keep a lightweight puffy jacket or fleece accessible and dry in my pack for evenings and breaks on colder days. Regardless of the season, I also always bring gloves and a hat. In case you missed it: it can get cold out there.
Lastly, camp shoes are essential to give your feet a break. We’ll discuss that more in the next section.
Socks, Footwear, and Foot-care
Footcare can make or break a hike. You are on your feet through rocky, muddy, rooty terrain all day. And your feet will get wet on the Long Trail, whether through rain, sweat, mud, or all three. Well-fitting shoes and socks will prevent blisters, but excess moisture can lead to hot spots and/or discomfort. Be prepared!
Footwear choice is primarily by preference based on the weight, height, style, support, and water repellence you require. I used heavy, leather, waterproof boots the first time I hiked the Long Trail. My feet were never wet from the rain or mud, but they did get sweaty. I wore trail runners on my last two attempts on the Long Trail and the last 1000 miles of my Appalachian Trail thru hike.
Trail runners offer enough support for me, with the tradeoff being wet feet from the rain and mud. They dry quickly, though, which is a win, and it’s easy to rinse mud away from the shoes and insoles in a stream.
When my feet get entirely soaked with water, the skin dries out later due to oils from my skin escaping in the moisture. It seems counterintuitive, I know. I’ve adopted a tip from ultra-runners: using Bag Balm (shoutout to another great VT brand) or another moisturizer on my feet. This helps my feet hold essential moisture and repair hot or soggy spots.
You will also need to give your feet rest. Kick off those boots or shoes when you eat lunch, and pack camp shoes (superlight sandals, flip flops, or Crocs are common choices). In addition to providing rest from your wet shoes or boots, you can walk in your camp shoes to the water source or privy without hurting your feet.
I hiked the entire Appalachian Trail in 2 pairs of Darn Tough socks. I hiked in one pair at a time, with the other hanging from my pack to dry as I walked. This was a thrifty approach; a third pair could have been nice on those wetter days/weeks. For your Long Trail hike, more than three pairs would be excessive. Check out my blog post on How to Choose Hiking Socks to narrow down the right sock choice.
Rain Gear
Rather than grouping raingear under clothing, it deserves its own callout. You will see rain on a Long Trail thru hike. Bring a lightweight rain jacket or poncho to keep the water off. I also recommend rain pants which can double as a hiking layer on those windy and/or rainy days. You can also use your rain gear as wind protection atop lofty peaks.
Raingear can be stuffy in summer. On hot, humid, rainy days, you might have to decide whether to get wet from sweating inside a rain jacket or get wet from the rain without it. I often hike without rain gear, opting instead to get wet from the rain. I keep my waterproof jacket and pants handy at the top of my pack to throw them on when I take a break and need to stay warm.
Use a pack cover if your pack isn’t entirely waterproof. I also hike with a contractor-grade trash bag lining the inside of my pack (much cheaper and just as light as an expensive “pack liner”).
Hydration
Some of the best water I’ve drunk is on the Long Trail – clear, cold, mountain spring water. Some of the murkiest water I’ve drunk is on the Long Trail – slow, cloudy, tannin-dyed trickles from beaver ponds.
The good news is that you often don’t need to carry more than a liter and a half at a time unless it’s hot out or another hiker or shelter logbook advises you to bring a little more.

You will need to treat your water through filtration, chemical drops or tablets, or boiling. Ultralight bottle top filters (check out Katadyn BeFree or Sawyer filters) eliminate silt from your beverage and make it potable. I’ll also bring water drops for the more questionable sources and in case my filter breaks (it’s happened!).
For my hydration setup, I carry a soft plastic bottle with a filter on top and a hard, wide-mouth Nalgene, which I can safely use for hot tea or coffee in the morning and for rolling out my muscles. Additionally, I bring an extra collapsible vessel or bladder for a combined total of 3-3.5 liters. I typically treat the full 3.5 liters when I get to camp so I’m good to go for dinner, breakfast, and getting me started in the morning.
Lastly, bring an electrolyte drink mix, tablet, or drops. You will sweat a lot and need those vital nutrients.
Cookware and Food
Some of the most common questions I get about backpacking are:
- “What do you eat out there?”
- “What stove do you bring?”
- “How much food do you carry at a time?"
These are all good questions to consider before hiking the Long Trail.
For a stove, I’ve used a Pocket Rocket by MSR, a JetBoil, and even an ultralight alcohol stove I made from a soda can. I also went stoveless for the last 1000 miles of the Appalachian Trail (mostly because I hated cleaning it. I did miss hot dinner and coffee, though…). Research and test the system before getting out on trail to ensure it works for you.
Don’t bother with a bowl; eating straight from the pot saves weight and means cleaning fewer dishes. The same goes for a cup: pour hot water directly into a heat-safe bottle for tea or coffee. And of course, don’t forget a utensil (I have STRONG opinions that it should be a spoon).
Food choice is a balance between weight, nutrition, convenience, and what you like to eat. I still surprise myself with how much food I can put away and how delicious simple food tastes when I hike all day. Eat often to keep your energy up! I typically eat three full meals and several snacks.
Sample Menu
Here us a sample menu of a day on the trail:
- Breakfast:
- Oatmeal or granola with powdered milk and dried fruit/nuts. Oats have fantastic nutritional value (carbs and protein!)
- Some folks go bagel with peanut butter to start the day instead of the above.
- Instant coffee or tea
- Mid-morning Snack: A trail bar, nut mix or GORP, jerky, crackers, or PayDay (a personal favorite).
- Lunch
- Wrap(s) with:
- Cabot cheddar cheese (it’s a VT thing. And yes, cheese does keep well on trail if appropriately wrapped)
- Salami or pepperoni or a tuna packet
- Dried hummus, a mustard packet, or other condiment packet
- OR, PB and J is an excellent wrap if you’re not feeling the above combo.
- Pair with potato chips, corn chips, or pretzels to get in some salt
- Mid-afternoon Snack: Same as the mid-morning snack above. Fritos are a personal favorite of mine for quick energy and much-needed salt for those final few miles.
- Dinner
- Carbs and protein are essential! I often go with a dried noodle, rice, or instant mashed potato dish with added protein through a meat packet and/or cheese. If I can find it, dried tortellini is one of my favorite trail meals, especially paired with sun-dried tomatoes and olive oil.
- Grocery stores often have great pre-fabbed packets of everything above, or you can make your own portions at home or outside the grocery store during resupplies.
- Spice it up a bit for variety! I use a dehydrator at home to make dried veggies and beans to add flavor to whatever I eat above. Taco seasoning packets or bouillon cubes are easy flavorings too.
- Dessert: Gummy candy or a piece of chocolate with a cup of tea to help me settle in for the night before hanging my food (see Critter Consideration section).
This menu is just one example of what I might eat on a given day. You can/will get tired of certain foods very quickly, so make sure to change it up! I haven’t eaten a certain brand of trail bar since my first Long Trail hike in 2010 when I had two a day for three weeks…it got old FAST.
Typically, 1.5 to 2 pounds of food daily is a nice rule to keep your weight down. Given ample resupply opportunities on the Long Trail, you shouldn’t need to carry more than 4-5 days of food at a time. We’ll get into that next.
Resupply
If you plan, you can hike the entire Long Trail without shipping resupply boxes. Several major road crossings make hitching a ride to town for a grocery shop or pickup easy. “Major road crossing” means a paved road here in VT (I wouldn’t try to hitch on a dirt road). Read your guidebooks to figure out where might be best.
In my experience, VT is a very safe place to hitchhike, and locals get excited when they see hikers who need a hand. Some road crossings are a little remote, so leave extra time in your day to wait for a car to and from town. There are also several hiker hostels, especially in the southern 100 miles of trail that is also the Appalachian Trail. Hostels can help with rides and even put you up for a night or two if you need a night off trail for a shower and warm bed.
Critter Considerations
The Long Trail is home to many critters. Remember, you are in their home (not vice versa). Be respectful and don’t intentionally feed or touch animals. You’ll hike by many beaver ponds (see the section on Hydration) and witness plenty of newts, toads, and moose droppings (and, if you’re lucky, a physical elusive moose™). I’ve also seen porcupine, fisher cats, deer, snakes (non-poisonous), and foxes on the Long Trail.

For food thieves, prepare for black bears, raccoons, mice, and chipmunks. Hang your food and any smellables (sunscreen, chapstick, toothpaste) at night, or stash it in a bear box supplied at some of the open shelters. This means bringing a waterproof bag, enough cordage, and a carabiner/clip to hang it properly.
My wife Anna recently bought a bear-proof bag that doesn’t necessarily need hanging (she still does though). These bags are common out west, where grizzlies and other bigger bears are more common. Mice like to hang out at shelters, so I recommend stashing your food or hanging it for hungry rodents.
Pro Tip: Finding and tossing your rope over a branch after dark can be difficult. Prepare the rope early when there is still light, then hang everything up after you eat dessert and brush your teeth.
Bugs
Unfortunately, this one deserves its own call out. The Long Trail passes through many dense and humid forests full of mosquitoes, gnats, flies, and ticks… dare I say more? Pick up a lightweight bug spray at your local gear shop! Also, consider sending your clothing away for permethrin treatment or (safely) treating it yourself (it really works!).
I occasionally hike with an ultra-lightweight tarp with no bug netting, which can be an itchy pain during peak buggy seasons. Consider your comfort around bugs and what you might require. I occasionally see folks hiking in a hat with bug netting. Not for me, but I respect the choice if you really can’t stand the little buggers.
Know the different types of ticks and the risks of each so you can identify and safely remove them. I did not get any ticks during my last Long Trail hike, but they’re out there. Check yourself nightly! I carry an almost weightless little hand mirror to assist in those darker, harder-to-see places…
Outdoor Essentials and Other Gear
Here is a list of other vital items and a quick note of why you should have them. Be prepared!
- Trekking Poles – I love trekking poles. The proper technique takes the impact off your legs in both directions. They save your knees on downs and help maintain good form on flats and ups. Your upper arms and shoulders will look quite toned after your hike (sexy!).
- Knife – to cut up delicious cheese, yes, but also in case of an emergency.
- First Aid Kit (including tick removal key or tweezers) – Creating your own lightweight kit is better and more affordable than buying a pre-made one. Whatever you bring, know what’s in it and where everything is so you can act quickly in an emergency.
- Emergency Blanket – it weighs practically nothing and could save your life! It can also quickly turn into a shelter or ground cloth in a pinch.
- Firestarter – to start your stove and light a fire in an emergency. A lighter is fine. Practice safe fire etiquette and Leave No Trace! Please, no open flames near tents, shelters, or dry forest floors.
- Compass – if you get off the trail, this can help orient you with your map and make sure you’re not going in circles.
- Headlamp and Extra Batteries – for reading and journaling after dark or finding the privy if nature calls. Good hiker etiquette in shelters or shared sites includes a red-light option if possible.
- Comb – not vital, but it helps keep your hair tangle-free, and it feels soooo nice to dip in a stream and run through your hair/beard when it’s hot out.
- Camera / Smartphone – It’s nice to check in with family along the way, take pictures, check the weather, and coordinate food drops and/or rides to town. Don’t expect service. Higher peaks should have a signal, but many valleys and road crossings do not. Hike in airplane mode to save battery.
-
Lightweight Battery Pack and Charger – Gotta keep the above charged. You’d hate to see an elusive critter and not get a photo.

- Floss/Thread, a Needle, and Safety Pins – In addition to dental hygiene, floss is a sturdy option for a quick patch job on clothing, shoes, or a pack. 3-4 safety pins could help too. They weigh almost nothing.
- Duct Tape – I neatly wrap a few feet around my trekking poles for necessary repairs. I’ve repaired shoes with duct tape and floss before. I also might use a strip here or there to help seal a chip bag.
- Lip Balm – nice to have! Lightweight.
- Anti-chafe Powder/Lubricant – if you know, you know…
- Soap – choose a biodegradable option (I use a small Dr. Bronners Castile Soap). Clean your cookware to be safe. There are also some great ponds and river crossings to take a swim/bath, or use a water bottle as a shower on those hot days.
- Sanitizer – use before eating and after using the privy. This can also help reduce the spread of bacteria or viruses on shared surfaces at shelters. I got Norovirus from a shelter on the Appalachian Trail, which was just awful.
- Cash (on top of an ID and Debit/Credit Card) — have a few lightweight bills in case your card is declined or you want to help pay for gas if you hitch a ride. There are several popular sites with caretakers as well. Consider donating to the Green Mountain Club!
- Toilet Paper – leaves are always an option, but TP is nice to have. If you carry wet wipes, pack them out and do not leave them in a privy.
- Freezer Bag(s) – sturdy and lightweight. Everything above goes into freezer bags to keep them dry and consolidated. Plastic bags are easier to see gear through than stuff sacks. They are hardy enough to use for the entire journey and further.
- Extra Freezer Bags – I always bring one of two quart-sized freezer bags just in case. They weigh almost nothing.
- Trash Bag – a designated sealable bag to put wrappers and other trash in. A small sandwich bag can suffice. You might even reuse one from your meals.
- Sweat Rag – a handkerchief, bandana, or sweat rag can be nice. I enjoy rinsing it in a stream to wash off the sweat on muggy days.
Luxury Items and Weight Philosophy
“Carry what you’re willing.” That’s the general rule for backpacking. There are many things you’ll find you don’t need to bring on the Long Trail.
In fact, my pack was heavier on my first Long Trail hike of 3ish weeks than at any point during my four months hiking the Appalachian Trail. I learned a lot on that first hike, and you will too if you’ve never backpacked before. Every ounce adds up.
This all said, I am not a true “ultralight” backpacker. When in doubt, I choose the item that will help me sleep best or be the most comfortable (within reason, of course, since I still like my pack to be light).
I always carry an additional luxury item. My luxury item might be an extra snack or delicacy - maybe a heavy avocado, banana, or can of soda or beer at a resupply to treat myself later at camp. Sometimes folks will add a pillow or a pair of extra-cozy sleep socks.
I carry a book to read at night to help me settle in (be courteous and bring a headlamp with a red light setting to be considerate of others). eReaders can help keep the weight and bulk down too if you’d like a whole library in your pack!
In the end, if you’re willing to carry it comfortably, it’s up to you if it’s worth the weight.
A Journal
Some might consider this a luxury item. I disagree. I’ve brought a journal (and pen!) on every long hike with no regrets. It helps me reflect on the day, remember fun, fulfilling, funny experiences years later, and share what I saw and learned with others.
I recently re-read my journal from when my scout troop hiked a 50-mile chunk of the Long Trail when I was 14. It was a fantastic trip down memory lane.

You can “certify” your Long Trail end-to-end hike with the Green Mountain Club by submitting details and sharing excerpts from your journal. The GMC then saves these excerpts in the Vermont State Archives, which is pretty dang cool if you ask me.
Take pictures as well. There is so much to see out there.
Go Out and Hike!
With summer rapidly approaching, I’m excited for you to pursue an adventure on the Long Trail. This blog post has hopefully offered you both information and encouragement to take on this fulfilling journey, whether for a day hike, weekend, or multi-week thru hike. It will not be easy, which will make the challenge even more special.
As I told you earlier, the Long Trail is my favorite place on earth. I know you’ll love it too!
Thru Hiking Checklist
Whether you're hiking the Long Trail, Appalachian Trail, or another thru hike, this backpacking gear checklist is a good place to start.
About the Author

Owen (Sir Owen VanGrizzle on the trail) works in Product Design and Development at Darn Tough. He's a resident sock tester, having thru hiked the Appalachian Trail in 2017 and Vermont’s own Long Trail twice. Owen and his wife Anna are taking on the Continental Divide Trail in 2023. Off the trail, Owen serves on the Board of Directors for the Green Mountain Club, with the mission of making the outdoors of Vermont accessible to everyone.